
Issue loans
Build integration to issue loans directly to borrowers' bank accounts
Before you start
- Make sure that you have completed Sign up and received a Trustly test account.
- If you have a native app implementation, integrate Trustly SDKs.
Issue loans flow
Issue loans flow consists of payout and deposit flows.
Payout flow
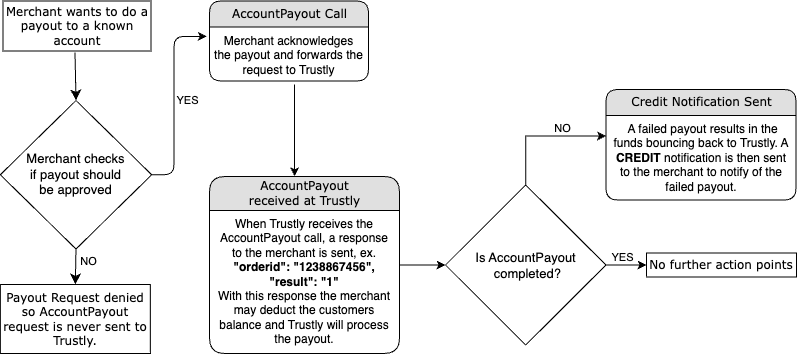
A typical payout flow
A typical payout flow is:
- When your system approves a borrower's request for loan, make sure that your Trustly account has enough funds to make the payout. You can schedule a daily Balance API call to ensure that your Trustly account has enough funds for the day.
Note: Funds must be transferred from your company bank account to your Trustly account before the payout can be made. No credit is given.
- When your system makes payouts to the borrower according to the approved loan request, it checks whether it already has the borrower's bank account details.
- If you do not have the borrower's bank account details, your system needs to call SelectAccount so that the borrower can select account for Trustly to respond with an Account ID:
- It sends an API call to
SelectAccountto get the borrower's account ID. - Your system presents Trustly to the borrower where they can select a bank, enter bank account details and amount to receive the payout.
- Trustly sends an Account notification to your system with an
AccountIDfor the selected account.
- It sends an API call to
- If your system have borrower's bank account details, you need to call RegisterAccount so that Trustly will register the account and responds with an Account ID:
- It sends an API call to
RegisterAccountwith the borrower's bank account details. - Trustly registers the account and responds with an Account ID.
- It sends an API call to
- Your system includes the
AccountID,Amount, andCurrencyfor the payout in an API call to API methodAccountPayout.
Note: An
AccountIDdoes not expire in Trustly system, so it can be used for multiple AccountPayout requests.
- Your system includes the
AccountID,Amount, andCurrencyfor the payout in an API call to API methodAccountPayout. - Trustly returns a synchronous response to let you know that the AccountPayout request has been received.
- Trustly sends the following notifications:
- Cancel notification when the payout is cancelled.
- Credit notification when the payout fails.
- Account notification to tell you more information about the selected bank account when the borrower has selected one.
- Payout confirmation when the money is successfully transferred from the borrower account in your system to their bank account.
- Your system responds to the received notifications.
Deposit flow
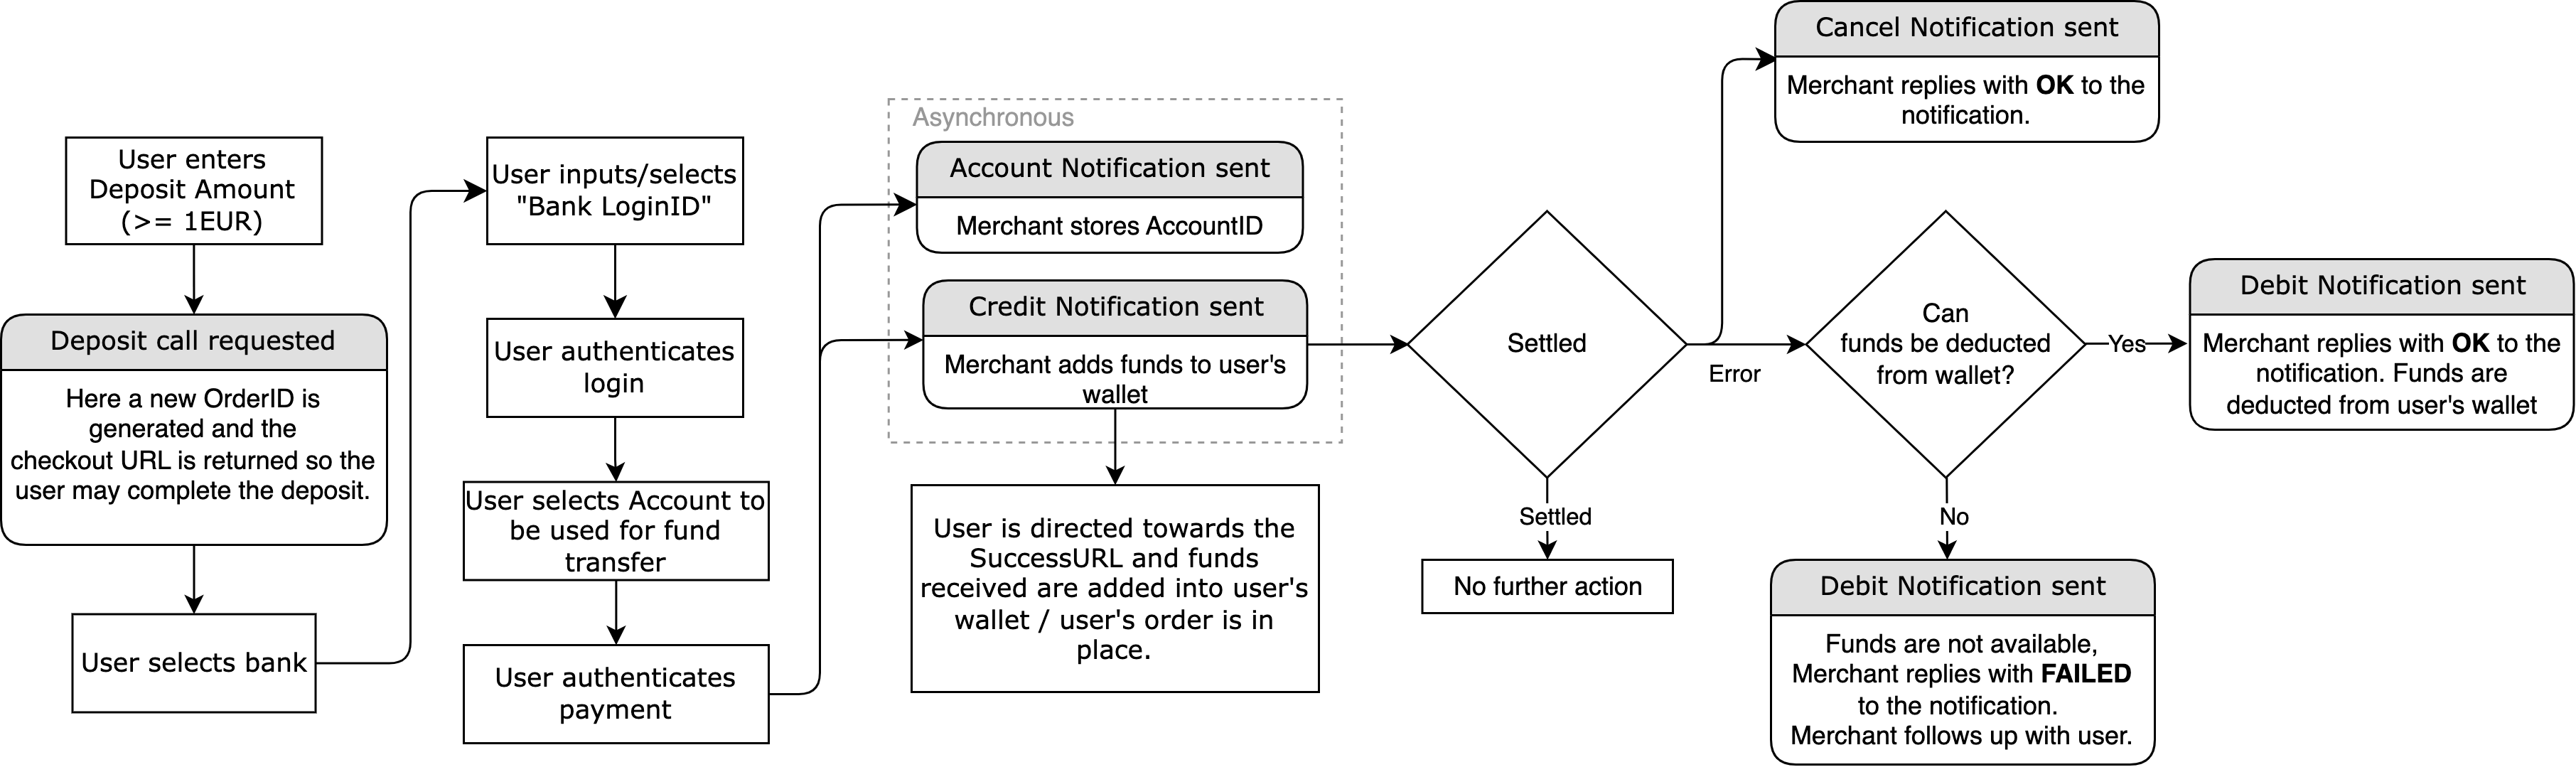
A typical Deposit flow
In a typical Deposit flow:
- Your customer enters the amount for transfer in your checkout.
- Your system sends an API call to Deposit .
- Trustly responds with a checkout URL and order ID.
- Your system redirects the customer to the Trustly checkout where they log in to their bank and authorise the payment.
- The customer will be redirected from the Trustly checkout to SuccessURL specified in the deposit API call.
- Depending on the outcome, Trustly may send these notifications:
- Pending notification when the customer has completed the checkout process.
- Credit notification when the payment has arrived at your Trustly account.
- Account notification Trustly sends information about the bank account used in this order.
- Debit notification if the transaction fails after the credit notification is sent.
- Cancel notification if the checkout process is interrupted.
Note: Account, Pending, Credit notifications can arrive in any order. The Account notification is not enabled by default. Contact Trustly Integration Support, if you need it.
- Your system responds to the received notifications.
Step 1: Integrate your system with Trustly
The business logic for issuing loans consists of payout and deposit flows to respectively issue loans and let borrowers pay back.
Issue loans
- Make sure that your integration follows Security requirements.
- A borrower makes a loan request.
- When your system approves a borrower's request for loan, it sends an API call to
Balanceto make sure that your Trustly account has enough funds to make the payout. - When your system makes payouts to the borrower according to the approved loan request, it checks whether it already has the borrower's bank account details.
- If you do not have the borrower's bank account details, your system needs to call SelectAccount so that the borrower can select account for Trustly to respond with an Account ID:
- It sends an API call to
SelectAccountto get the borrower's account ID. - Your system presents Trustly to the borrower where they can select a bank, enter bank account details and amount to receive the payout.
- Trustly sends an Account notification to your system with an
AccountIDfor the selected account.
- It sends an API call to
- If your system has borrower's bank account details, you need to call RegisterAccount so that Trustly will register the account and respond with an Account ID:
- It sends an API call to
RegisterAccountwith the borrower's bank account details. - Trustly registers the account and responds with an Account ID.
- It sends an API call to
- Your system includes the
AccountID,Amount, andCurrencyfor the payout in an API call to API methodAccountPayout.
Get loan payback
-
When it is time for the borrower to pay back their loan, your system requests the borrower to pay back.
-
When the borrower starts the payback process, your system calls
Deposit. See Deposit. -
When Trustly responds with a URL, your system presents the URL to the borrower where they can select a bank, enter bank account details and the payout amount to receive.
-
Depending on the outcome, Trustly may send any of the following notifications:
-
Make sure that your system logs and handles error codes that are returned from API calls. See Error handling.
-
Make sure that your integration responds correctly to notifications that Trustly may send out.
Step 2: Design service presentation
For issuing loans, there is no Trustly checkout interaction. You need to create an interaction for the borrowers to accept the loans with Trustly.
For receiving payments on loans, when your integration presents a Trustly URL to borrowers the presentation must follow Trustly checkout guidelines.
Step 3: Do acceptance testing
Prior to going live, the Trustly Integration Specialist will perform Acceptance testing. Make sure your integration has passed all test cases, including:
- AccountPayout API calls
- SelectAccount API calls
- RegisterAccount API calls
- Deposit API calls
- Built-in test cases of acceptance testing: D1 to D5, and G1 to G3
- Verify that your integration has the correct responses to notifications. See Notification tool.
Step 4: Verify and go live
Follow the instructions to go live.
Updated 8 months ago