Follow requirements and scope to do acceptance testing
Before going live with Trustly we need to verify that the integration is implemented correctly. This page describes the acceptance testing / verification procedure and the different tests that are required for each API method. Once you have performed all the required tests and are happy with the result, please ask your Trustly contact person to review the integration. Once the integration has been approved by Trustly you will get your live credentials.
General requirements - all API methods
- All required parameters and attributes must be sent as described in the documentation page for each API method.
- Notifications must be responded to correctly.
- Special characters (Å/Ä/Ö/Ü etc) that are passed in the API calls must be correctly UTF-8 encoded. So at least one of your test transactions should contain one of those characters so that this can be verified.
- For all API methods that require an EndUserID it's important that this value uniquely identifies the end-consumer in the merchant's system.
- Trustly should get access to your test site in order to make a test transaction. Please provide your Trustly contact with all the necessary details (URL to your test page, username/password etc). If this is not possible for some reason, please provide your Trustly contact with a screen recording (or screenshots) that shows the end-user experience and how Trustly is presented on your website.
- Make sure that Trustly is working on all platforms that will be used (desktop / mobile website / mobile app).
- If you receive an error code from our API, make sure that your system logs it and that you investigate it on your side.
- Trustly must be presented correctly on your payment page, as described in our Service Presentation. Please provide Trustly with screenshots or a screen recording of your implementation so that we can review and approve it.
For Deposit, Withdraw, SelectAccount
The URL returned by Trustly's API must be accessed using HTTPS GET (but the JSON-RPC calls to Trustly's API should be sent using HTTPS POST).
Native app requirements
- If you are using Trustly from within your own iOS / Android app, please make sure that you are following our native app guidelines. We recommend using Trustly's SDK for iOS and Android, or redirecting the user to a stand-alone browser as a fallback method (if our SDK is not possible to implement for some reason).
- Make sure that redirects work in your native app implementation. This can be verified in Trustly's Test Environment by using our "mock banks", just follow the steps here. Please make a screen recording when testing this and send it to Trustly's integration team for verification.
Additional requirements for specific API methods
Deposit
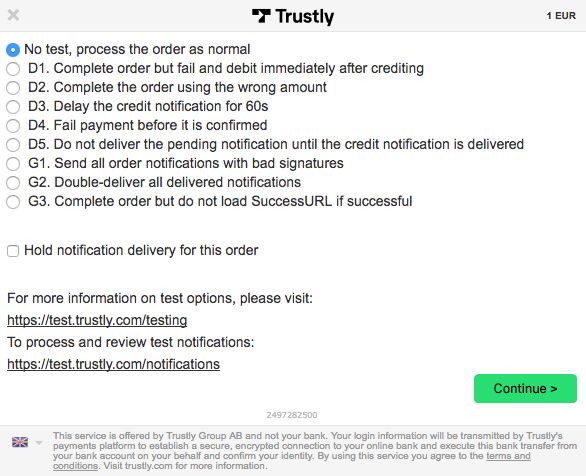
- Run built-in test cases by clicking "set order options" in the Trustly iframe. After selecting the test case you should complete the deposit flow. All test cases (D1-D5 and G1-G3) must be completed, see below for more details and screenshots.
Refund
- Perform a full refund and a partial refund.
- Perform a refund that exceeds your current total balance. Please reach out to Integration Support for assistance in resetting your balance before this test.
Withdraw
- Complete the withdrawal flow in the Trustly iframe and then approve it by using the ApproveWithdrawal method (unless automatic approval is enabled). The end user's balance on the merchant's system should be debited as soon as the debit notification is received. Once the withdrawal has been approved the money will be sent to the end-user.
- Complete the withdrawal flow in the Trustly iframe and then deny it by using the DenyWithdrawal method. The end user's balance on the merchant's system should be debited as soon as the debit notification is received. Then when the withdrawal is denied, a credit notification will be sent and the funds should be credited back to the end user's account balance.
- Run built-in test cases by clicking "set order options" in the Trustly iframe. After selecting the test case you should complete the withdrawal flow. All test cases (W1 and G1-G3) must be completed.
RegisterAccount
- Make at least one RegisterAccount call for each country to which you will do payouts. So for example, if you will do payouts to Sweden and Finland you should test both Swedish and Finnish bank account details in RegisterAccount. NOTE: for some countries, the bank account details should be provided in IBAN format. For other countries, it should be in the local format, see RegisterAccount.
AccountPayout
- Simulate a failed payout by sending an AccountPayout request where the amount is larger than the available balance on your Trustly account. You can see your current balance in Trustly Back Office. A credit notification will be sent to your NotificationURL to inform you about the failed payout, and you must reply with a valid notification response.
SelectAccount / Deposit with mandate registration and Charge (Trustly direct debit)
- Run built-in test cases by clicking "set order options" in the Trustly iframe. After selecting the test case you should complete the SelectAccount flow. All test cases (DD1-DD3 and G1-G3) must be completed.
- Note: after running test case DD3 you should also try to do a Charge from the AccountID that was used in the DD3 test case.
Triggering test cases in the Trustly iframe
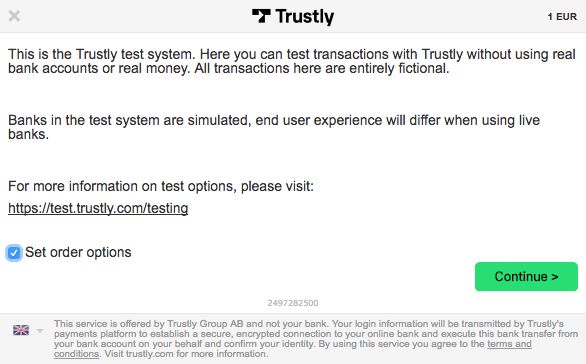
For Deposits, Withdrawals, and SelectAccount with mandate registration (Trustly Direct Debit) it is possible to trigger various test cases in the Trustly iframe after selecting the bank. This step will only be displayed in our test environment, not in production. See screenshots below for the Deposit flow. For Withdrawals and SelectAccount the test cases will be different.
Click "Set order options"

Set order options
Select the test case that you would like to trigger, then complete the remaining steps in the iframe.

Test cases
You can see which test cases have been triggered by using the Trustly Back Office, under "Integration Test" -> "Order Test Cases". Click on the green arrow to the left of each row to see a more detailed description of the test case and the expected result.
Once the acceptance testing has been completed and verified by Trustly, the next steps are:
- Generate a new private and public key and send the public key to your Trustly contact person.
- Let your Trustly contact know to which mobile phone number (including country code) the live API password and Back Office password should be sent.
- If you need to open your firewall for incoming requests, please ask your Trustly contact to provide the list of IP addresses from which notifications will be sent.
- Once Trustly is live on your website, please provide your Trustly contact with screenshots that show how Trustly is presented on your payment page.
Test case details
More detailed information about the built-in test cases and the expected outcome of each test case can be found here.
